Lets blog hop with Wow and Ruby Rock-it…. Come join us!

RR_and_WOW_Blog_Hop

Hello WOW Embossing Powder fans and Ruby Rock-It Fans!  We are delighted to have you join us this week for the fun with our blog hop!

We are very excited to be partnering with this fabulous company and their amazing designers, so here’s all the info you will need…and then come and join and hop along!

Here’s the blog hop order, all you need to do to be eligible for our prize, is to leave a comment on each designer’s blog and then come back to our blog letting us know you have done so!  Comments will be closing on Friday, November 21st at 11:59pm PST.
Ruby Rock-It Blog
WOW Embossing Powder Blog
Nikki Smith
Sandie Dunne
Pattie Beltran
Susan O’Connell
Donna O’Leary
Erin Yamabe
Irit Shalom
Jen Deal
Alicia Barry
Jenifer Cowles
Patti Hamil
Beck Beattie
Nicole Picadura
Maya Isaksson
June Goh
Trish Latimer
Nataliya Serova
Beckie Dreyer
Sian Ridley
Kaka Costa
Christine Saunders
Candice Elliott

Here’s our beautiful prize:  The Essence East Coast collection! [album not included]

1939660_680203648704150_16173656_o

and Wow’s wonderful prize

10628402_10152858710379770_8201123855956397712_n 111

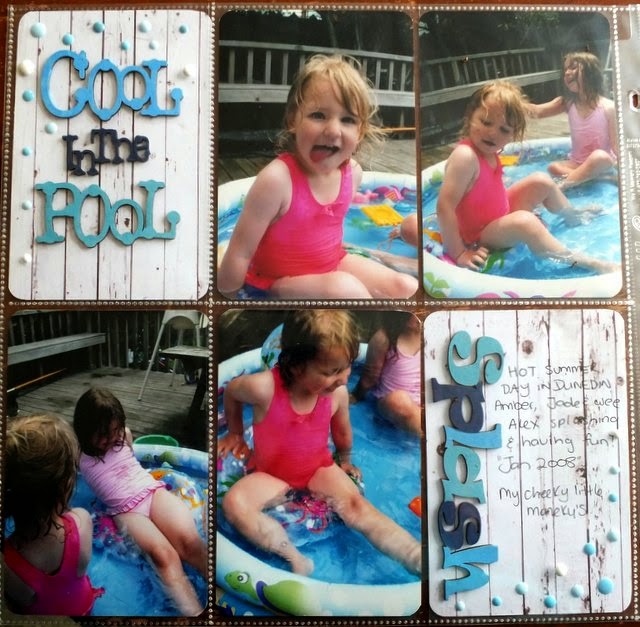
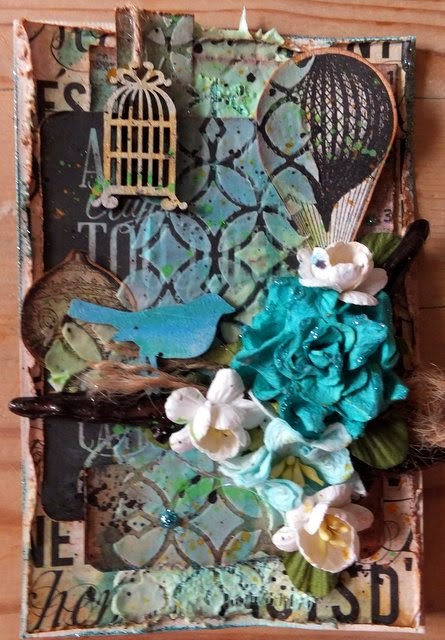
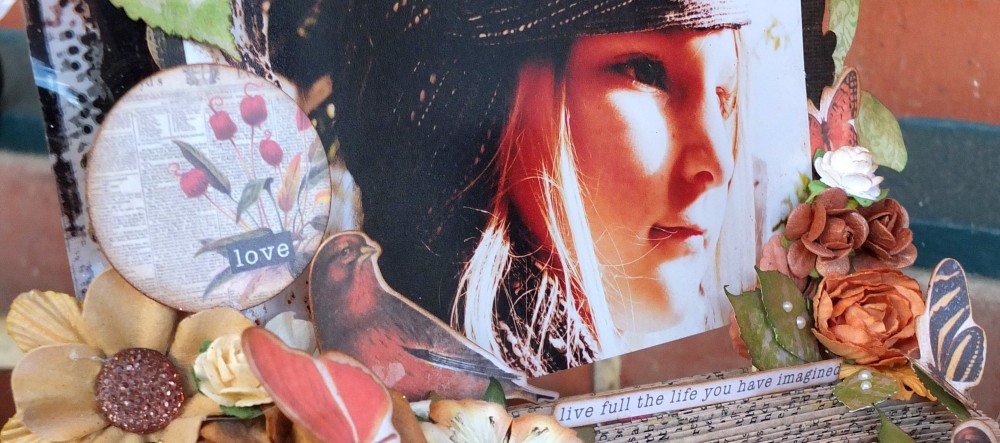
And here’s my project!

I made a Recipe Box using the stunning papers and all the very cute die-cuts, twine and enamel dots.  I got some of my favourite wow embossing colours and high-lights elements of the die-cuts and paper.

DSCF0378

DSCF0382

your next stop is at Erin Yamabe blog.  Remember to leave comments on the blogs and go back to WOW and Ruby Rock-it to get yourself into the draw for 2 stunning prizes

Enjoy the hop!

Thanks for stopping by.  Donna xox

WOW EMBOSSING POWDERS AND SCRAPBOOKING ADHESIVES 3L BLOG HOP

Did you know that Scrapbooking Adhesives 3L and WOW Embossing Powders have been having a blog hop this week!  It’s not to late to play along!  I made this project for the hop!

DSCF9860

I started off by using a mask and versa mark around the outer side of the jar.  Sprinkled opaque bright white embossing powder over the versa mark and heated.

DSCF9865

I got the Scrapbooking Adhesives 3L adhesives sheets and cut to the size of the jar lid, stuck it on and then applied Blue Blast embossing powder to the sticky part and embossed.  Such an easy way to embossing metal.  I then got some strips of adhesive sheets and applied to the sides of the jar lid and repeated above instructions.  I also used the adhesives sheets to apply the lace.  Pull back a bit of the protective sheet to expose the sticky adhesive.  Lay your lace on top and rub your finger along it.  It will leave sticky adhesive to the back of the lace and then you will be able to attach to project.

DSCF9867

I embossed the outer side of the tag and used many DODZ to attach the flowers to the top of the jar lid and the tag.  These are great and can be cut down a little if you are only needing a small dodz.  Thanks for popping on over.  Please go back to WOW EMBOSSING POWDERS and SCRAPBOOKING ADHESIVES 3L make sure you comment on all the post to enter the draw 🙂  happy scrappin xox Donna

MEMORY MAZE POST

Donna’s October Projects

Hello all,  It’s my turn today to share some projects I have been creating.  I have created three projects this month to share,  a layout, some pocket pages and a card.  Hope you enjoy.
* * * * * * * * * * *
FAMILY TOGETHER

I love playing with mixed media products and memory maze chipboard works perfectly with many of the products out there on the market

I have painted the cherry blossom with Ranger distress paint and then stamped it with archival black ink for texture.

I broke my cherry blossom up so I could spread it over my layout.

I used leaves from a sheet set and again painted them with ranger distress paint, this time i used a few different colors.  I inked the edges with distress ink and then found a different stamp and stamped to add texture.
* * * * * * * * * *
COOL IN THE POOL

Lately I have been trying to organise my many boxes of photos and trying to get them into albums.  I liked the pocket page idea as I can get more photos in and tell the story with little effort.  I keep it very simple and then have been adding 12 by 12 layouts to the albums to.

I cut this title up as it was all joined together and would not fit into the pockets.  I love how this has turned out,  you would not think I had cut them up.  As with the layout I have painted my chipboard to suit the colours of my photos.

Splash had a big splash attached to the H.  For the life of me I could not get the colouring right so I just removed it.  which also allowed me to attached the word down one of the cards instead of across.

My wee man is all grown up now but I remember this day so easily.  He was so excited to see all the water and no matter how hard I tried to actually get him in the pool,  he preferred  to play around it.  He is such a wee cutie.

I cut my chipboard up so I could spread it out over the two pockets to make it my focal point,
 again this has just been painted.
* * * * * * * * * * *
ENJOY TODAY~IT’S A WONDERFUL LIFE
I love how this turned out!  I had to Google image the van to see where the chrome went.  I then used and embossing pen and added the detail.  I embossed it with a silver embossing powder and then painted.  LOVE IT!

Altered Clock and WOW Embossing Powders

Re-blogged by me from WOW EMBOSSING POWDERS

Hello and welcome back to WOW Embossing Powders,  Donna here today to share a project that I created.  This months theme is TIME.  It took a while to think what I could create, but once I had that pic in my mind it came together nicely.

TIME IS PRECIOUS…WASTE IT WISELY

I have had this Tim Holtz clock for a while now and knew I wanted to do something special with it.  I thought it would fit nicely into this months theme of time.

There was a lot of prep work for this project.  I covered the entire clock in white distress paint.  Why you ask, to give my surface some tooth.  I knew I wanted to emboss on it and I needed something for the embossing powder to grip to.  Once my paint was dry I covered it in a layer of Blue Topaz (such a stunning colour)  and heat embossed it.  I then got a mask out and in sections I added versa mark ans then vanilla white, again heat embossing.
I then spent some time adding more embossing powder for highlights,  I added Calypso to areas and  to blend them in I added more Vanilla White.  After I had got the colours right in my mind I then added some distress paint to areas.
For the inside of my clock I tissue papered and then sprayed with Lindy’s gang sprays (fallen in love with these) then added some fussy cutting and built up a scene.  I have used Memory Maze chipboard birds and embossed them with Blue berry
These lovely little memory Maze Girls have been embossed with Seafoam White and added to my scene with some foam dots.  Once my scene was complete I added to clock frame with some flowers and a wee saying.  To me one of the girls is telling some thing to the other,  so I found the quote ” Time is Precious, waste it wisely”  which again goes really well with our theme .
Some more close ups……
WOW EMBOSSING PRODUCTS USED
WH14 Blue Topaz
WS62R Calypso
WJ06 Blueberry
WL02 Seafoam White
WL03 Vanilla White
Thank you for popping by the WOW Blog,  I hope you enjoyed my project.  Don’t forget to have a go at this months challenge……
For our challenge this month, we’d like you to create projects inspired by the theme:TIME! It can be a card, scrapbook, mini album, an altered item, or anything that you can think of! You must use our products or heat embossing on your project, and please mention what you’ve used on your project if it’s not clear from the photos.
By entering the challenge each month, you’ll get a chance to win a set of 6 embossing powders in a handy carry case. The winner will be randomly selected from eligible entries.
Remember, all projects must have either heat embossing or use our products to qualify!
You must also be a follower of our blog to enter*.


Happy Scrappin everyone, take care 🙂  Donna xox

Mixed media fun

Hello all. hope all is going well at your place today.  It’s extremely windy here so my photos have been taken inside today.  I have been playing a lot lately with mixed media products and Memory Maze is a must have on the table to complement my projects.

* * * * * * * * * * * * * * *
WHAT A DAY


This layout is inspired by a class that I took with Limor  Webber,  amazing tutor and some very fun and funky techniques.  I have used the Memory Maze Arrows to frame my photo.  I have dressed the Memory Maze with Lindy’s Gang sprays to give them colour.


* * * * * * * * * * * * * * * * * * * *
MIXED MEDIA CARDS
My Second project I created was some cards,  I love how Memory Maze have the perfect wee chippie just the right size for any project.  Here I have used an assortment of Memory Maze pieces left over from other projects.  A great way to use all those extra bits.


Close up of the three Cards


* * * * * * * * * * * * * * * * * * * *
A TREASURE BOX


This was a fun wee project to create on a COLD winter night in front of the fire.  I have embossed the entire wooden box and then used sprays to fill in the negative space, love this effect.


I have decorated the top with a number of the lovely flowers you can now get through Memory Maze and an assortment of their cogs which have been lightly misted.


Our Family

Hello all and welcome back to my wee part of cyber space.  Today i have a layout to share with you that I created for Another Freaking Scrappy Challenge.

This time we have a sketch to inspire us!


…Hey scrapbookers/art journallers – we have two challenges every month, and you can play along with our prompt challenge and sketch challenge each month until the end of the month.  Don’t be shy, we really do want to see your work and share in the fun with you!  

Here is our sketch challenge for May – come play along!!! 


Our sponsor is Scrapbook Fantasies, owned by design team member Alicia Redshaw. Alicia will send a beautiful pack of ribbons to a randomly drawn participant.  

Here is what I created for the challenge.

My Family

DSCF7706

I hope you come over and play with us,  Look forward to seeing what you have created 🙂

Happy scrappin, take care xox Donna 🙂

A New Life… WOW Embossing Powders


Hello Donna here to share with you what I have created for this month’s theme  Antique!   I have made something new and from old and given it a new life on my daughters dressing table.

I started off with a very old antique looking makeup mirror and gave it a face-lift.  I pulled it all apart and painted the whole entire frame work with distress paint to prime the surfaces.

I then embossed them all, some places have a few layers.

I love making things look old so I had to add a touch of Verdigris over the metallic copper


I embossed the base with a mixture of bright white and opaque pastel blue with a sprinkle of Verdigris to carry the colour threw.

For the back I stamped with the vintage wall paper stamp.  Added a blue wash over the entire surface and then embossed several time with clear.  I was trying for the broken glass effect but did not have a lot of luck as I only had super fine clear left in my stash 😦

Then it was time to decorate my frame

Before I added the decoration I did add a couple of layers of crackle paint over the base and  I love the effect it had.  In areas it has peeled away from the base! PERFECT!

I had made lots of embellishments with our  silicone moulds

and popped them throughout the flowers.

Hope you have all enjoyed my share this month.  Look forward to seeing what all you lovely WOW fans create for this months challenge.  Happy Scrappin everyone xox Donna 🙂
WOW products used this month.
Clear super fine
Opaque bright white
Opaque Pastel blue
Metallic Copper
Colour blend Verdigris
Vintage wallpaper stamp
WOW silicone moulds
Melt it


EXCITING NEWS…….. LIMOR WEBBER COMING TO SCRAPBOOK PARADISE

How exciting is this,  Limor is coming to Scrapbook Paradise!   So here are the details and who to contact to get your spot!… hurry as sets wont last long.

Scrapbook Paradise

Dunedin, NZ

Friday June19th-Sunday June 21st

For bookings please contact Elena Martin

6434762131

MIXED MEDIA AUSTRALIA/NZ TOUR

In other news my Australia/NZ tour is approaching fast and spots are filling up!!! to book your spots head on over to all these spots near you to get your seats!

This tour is completely Mixed Media focused which makes it so much fun!! We have Prima Marketing, Lindy’s Stamp Gang and Faber Castell Design Memory Craft as the fabulous sponsors on this tour so you can be sure to get the latest and greatest products in the industry!

Tackling White Space – 3 layouts in 1 class

One of the hardest things when creating is working with white space without completely junking the page and making it cluttered.  In this class we will focus on several techniques to create WOW layouts while allowing us to still have white space on the page that completely makes the page appealing to the eye.  We will be using several Mixed Media products such as Prima Chalk Inks, Lindy’s Stamp Gang sprays, Gelatos, Art Mediums, India Ink and more.

Layout Australia 2014

Mixed Media Canvas

This class is all about discovering texture, dimension, layers and composition.  We will be exploring the art of combining art mediums and colors without turning our colors in to mud.  This class is jammed packed with techniques you will fall in love with!

Mixed Media Canvas Australia

Art Journal Cover and Inside Pages

This full day class will take you through the creation of a full Art Journal and it’s inside pages.   The Journal will include canvas pages, kraft pages, watercolor pages and more!  If you have been dying to learn all about Art Journaling but have been too afraid to try, this is certainly the class for you! This class is designed to take you through a creative journey and exploration of a ton of art mediums, colour combination, composition and a whole lot more!

art journal australia

Best Mates

One thing I find hard is creating layouts for my boys,  there is so much product out there for our girls but so hard to find exciting boy products.  I received a parcel from MEMORY MAZE CHIPBOARD and it it included lots of arrows.  Arrows can be used for many things but I thought that they would look great on a layout for Alex.
Alex has found a wee mate who just lives around the corner. He loves to go round and play.  I wanted to create a layout that  showed their friendship.  This is what I came up with.

I added memory Maze arrows to frame my photo,  these have been altered by adding distress paint and hammered a bit to give texture.  I then got other colour distress paint  and rub it on with my finger to give more interest.

I added Tim Holtz rub-ons to the photo.

For the background I used one of my favourite techniques to do.  Using a mask I add heavy gel medium and then use WOW foil papers over top. Yummy effect!

Close up of some of the arrows and the different texture you can create.

Thanks for popping on by,  hope I have inspired you to go get those photos out and have some fun.  Happy Scrappin everyone xox Donna


Hand made with love <3

I created this layout of my mum and oldest daughter Sammy.  Sammy had her 21st this year and my mum and family came down to celebrate with us.  My mum had a special gift for her.  She had spent MANY hours making a crazy quilt for her our of velvet.  My mum did not have a sewing machine at the time and she hand stitched the whole quilt together and THEN she added embroidery stitches to every patch.  Talk about labour of love.

So I created a layout of mum finishing off the quilt on my sewing machine and then the very special time when Sammy received the quilt xox

Memory Maze had the perfect chipboard to complement my layout.  A reel of cotton with needles.  I used metallic rubs and white pen on this.  I then threaded cotton around it to make it look real.
I added the wee hearts to show the love in these photos, again I kept it simple and just coloured it white.

Here you can see the pride in my mums face.  This was the last part of the quilt.  Finished after many hours of love!  I added a needle to the flowers with thread and some more hearts.  The fancy stitches in the background are a stitch my mum showed me how to do, and a did on a couple of the patches.  I wanted to added some sort of stitching to the layout.

The last chipboard I added was the scissors which I coloured with pen.  mums scissors were red 🙂
I am going to get this layout framed and send to my mum.
I love my Mum,  Happy mothers day,  I wish I could be there to give you a big cuddle.